UNDER EYE COLOR CORRECTOR
Have you ever spent time carefully applying your concealer, only to look in the mirror and see that those dark circles or red spots are still peeking through? It can feel frustrating. You might think you need a thicker, heavier product, but that can often look cakey and settle into fine lines. What if there was a magic trick to neutralize those discolorations before you even put on your concealer?
There is, and it’s called color correcting.
This guide is your one-stop resource for understanding everything about color correctors, especially the most popular type: the UNDER EYE COLOR CORRECTOR. We’re going to break down the science of color, help you UNDER EYE COLOR CORRECTOR choose the right products for your skin concerns, and give you a step-by-step routine you can follow. Get ready to unlock the secret to a smooth, even, and radiant complexion.
Table of Contents
ToggleWhat is Color Correcting, Anyway? The Basics.
In simple terms, color correcting is a makeup technique that uses opposite colors on the color wheel to cancel out unwanted skin discolorations.
Think about painting. If you have a yellow mark on a piece of paper and you put blue paint over it, you’ll get green. But if you want to cancel that yellow, you’d UNDER EYE COLOR CORRECTOR use a color directly across from it on the color wheel. In this case, that would be a purple or violet shade. The purple neutralizes the yellow, creating a neutral base.
Our skin has different types of discolorations:
-
Bluish or purplish tones under the eyes from thin skin and visible veins.
-
Redness from acne, rosacea, or broken capillaries.
-
Sallow or yellowish tones around the mouth or on the eyelids.
-
Dark spots or hyperpigmentation, which can appear as deep purple, brown, or gray.
By applying a thin layer of a correcting color before your foundation or concealer, you can counteract these tones. This means you won’t need to pile on as much skin-toned concealer later. The result is a much more natural, seamless, and less heavy finish. This is the core principle behind using an UNDER EYE COLOR CORRECTOR.
The Color Wheel: Your New Best Friend in Makeup
To master correcting, you need UNDER EYE COLOR CORRECTOR to understand a little bit about the color wheel. Don’t worry, it’s not complicated! It’s all about finding opposites.
Here’s a quick cheat sheet for what each color corrector is used for:
-
Peach, Orange, and Salmon Colors: These are the superheroes for dark circles. They counteract blue, purple, and bluish-purple tones. The general rule is: the deeper your skin tone, the deeper the corrector shade you’ll need.
-
Light Skin Tones: Start with a light peach or pink UNDER EYE COLOR CORRECTOR.
-
Medium to Tan Skin Tones: A rich peach or salmon-colored UNDER EYE COLOR CORRECTOR works best.
-
Deep to Rich Skin Tones: A vibrant orange or even a red-toned UNDER EYE COLOR CORRECTOR is most effective at canceling out the deep dark circles.
-
-
Green Correctors: Green is directly opposite red on the color wheel. This makes it perfect for neutralizing:
-
Red acne pimples and acne scars
-
Rosacea flare-ups
-
Redness around the nose
-
Any other general redness on the face.
-
-
Yellow Correctors: Yellow is great for balancing out:
-
Purple or mild blue tones (for some skin tones)
-
Covering up mild bruising
-
Brightening the skin overall. A yellow powder is often used to set under-eye concealer and add brightness.
-
-
Lavender or Purple Correctors: These shades cancel out excessive yellowness or sallowness in the skin. They are excellent for:
-
Brightening a dull complexion
-
Counteracting yellow-toned bruises
-
Correcting the area around the mouth if it looks yellowish compared to the rest of the face.
-
Understanding this color theory is the first step. The next step is choosing the right formula, especially when selecting the perfect UNDER EYE COLOR CORRECTOR for your specific needs.
Why the Under-Eye Area is So Tricky (And Why It Needs Special Attention)
The skin under our eyes is different from the skin on the rest of our face. It’s much thinner, more delicate, and has fewer oil glands. This is why it’s often the first place to show signs of tiredness, aging, and dryness. Dark circles can be caused by many factors:
-
Genetics: For many people, dark circles are simply hereditary. You might have naturally thinner skin under your eyes, making the blueish-purple blood vessels underneath more visible.
-
Volume Loss: As we age, we lose fat and collagen in our face. This can create hollows under the eyes (often called tear troughs), which cast shadows that look like dark circles.
-
Lifestyle Factors: Not getting enough sleep, high stress, and dehydration can all make the under-eye area appear darker and more sunken.
-
Allergies: Rubbing your eyes due to allergies can break tiny blood vessels and worsen darkness.
Because this area is so delicate, it requires a gentle touch and the right products. A heavy, dry concealer will quickly settle into fine lines and look crepey. This is precisely why a dedicated UNDER EYE COLOR CORRECTOR is a game-changer. It’s specifically formulated to be lightweight, hydrating, and pigmented enough to neutralize discoloration without looking heavy.
Choosing the Right Formula: Creams, Liquids, and Sticks
Color correctors come in several different forms. The best one for you depends on your skin type and the area you are correcting.
1. Liquid Correctors
These are often the most beginner-friendly and are fantastic for the under-eye area. They typically come in a tube with a doe-foot applicator or in a pump bottle.
-
Pros: They are usually lightweight, blendable, and easy to layer. They work well for large areas of redness and are great for dry or mature skin because they don’t settle into lines as easily. Many popular UNDER EYE COLOR CORRECTOR products are liquid formulas.
-
Cons: They can sometimes be less pigmented than creams, meaning you might need a little more product.
-
Best For: Under-eyes, large areas of redness, and normal to dry skin.
2. Cream Correctors
Cream correctors are highly pigmented and have a thicker, velvety consistency. They often come in small pots or compact palettes.
-
Pros: They offer maximum coverage and staying power. A little product goes a very long way. They are excellent for spot-correcting stubborn acne scars or very dark circles.
-
Cons: They can be trickier to blend and, if applied too heavily, can look cakey under the eyes. They are better for oily or combination skin.
-
Best For: Spot correction (acne, scars), and very dark circles on oilier skin types.
3. Stick Correctors
Stick correctors are like thick, pigmented crayons. They are very direct and easy to apply precisely.
-
Pros: They offer great control for pinpoint accuracy. They are also portable and easy to use on the go.
-
Cons: They can be quite thick and may drag on the delicate under-eye skin if not warmed up first.
-
Best For: Spot correcting blemishes and for touch-ups throughout the day.
4. Palette Correctors
Palettes contain multiple corrector colors in one compact. They are great for makeup artists or for someone who has multiple different skin concerns to address (e.g., redness around the nose and dark circles).
-
Pros: Versatility. You have all the colors you need in one place.
-
Cons: Can be overwhelming for beginners. The formulas in palettes can sometimes be drier than individual products.
-
Best For: Makeup enthusiasts and those with varied correction needs.
When shopping for an UNDER EYE COLOR CORRECTOR, look for words like “hydrating,” “radiant,” “creamy,” and “lightweight” on the packaging. Avoid formulas that are described as “matte” or “full coverage” for this area, as they can be too drying.
Your Step-by-Step Guide to Applying Under Eye Color Corrector
Now for the fun part! Let’s walk through the exact steps to achieve a bright, smooth under-eye area. Using an UNDER EYE COLOR CORRECTOR correctly is key to avoiding a gray or ashy finish.
Step 1: Prep and Moisturize
This is the most important step for a flawless finish. Always start with a clean face. Then, apply a hydrating eye cream. Gently pat the eye cream into the skin under your eyes with your ring finger (it applies the least pressure) until it’s fully absorbed. A well-moisturized under-eye will prevent the corrector and concealer from clinging to dry patches and creasing. This creates a smooth canvas for your UNDER EYE COLOR CORRECTOR.
Step 2: Apply Your Color Corrector
-
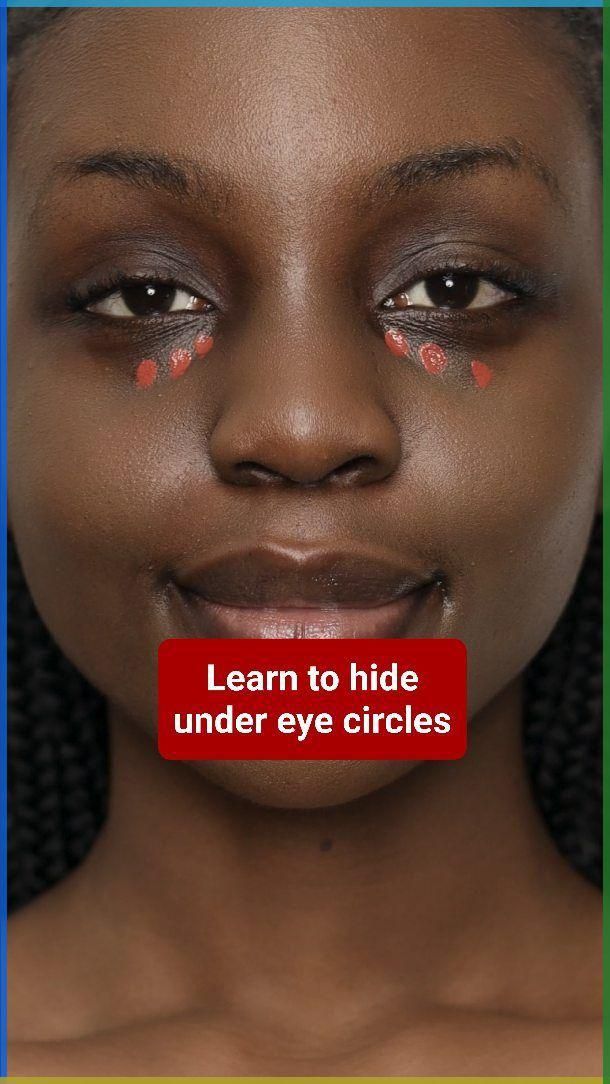
Choose Your Shade: Based on your skin tone and the color of your dark circles, select your peach, orange, or salmon UNDER EYE COLOR CORRECTOR.
-
Application: Less is more! You only need a tiny amount. Using your fingertip, a small synthetic brush, or the applicator itself, apply a few small dots of the product only to the areas that are discolored. This is often in the inner corner and the outer corner of the eye, following the hollow of the eye socket. Avoid applying too much product directly under the lower lash line, as this can make the eye look heavy.
-
Blend, Blend, Blend: Gently pat the product into the skin. Do not rub or swipe, as this will remove the product and irritate the delicate skin. You want to blend the edges seamlessly so there’s no obvious line of color. The goal is to see the discoloration neutralized, not to see a layer of orange on your skin. A beauty sponge can also be used for a seamless blend.
Step 3: Apply Foundation
This is a common debate: corrector before or after foundation? For most people, especially with under-eye concerns, applying corrector before foundation is best. This way, your foundation will help to blend the corrected area with the rest of your face. Apply your foundation as you normally would, and when you get to the under-eye area, use a stippling or patting motion to gently layer the foundation over the corrector. Avoid swiping, which can move the corrector around.
Step 4: Apply Skin-Tone Concealer
After foundation, assess your under-eye area. You might find that the color correction has done most of the work! If you need a little more coverage or brightness, now is the time to apply a skin-tone concealer. Choose a concealer that is hydrating and only one or two shades lighter than your foundation. Apply it in a gentle patting motion, focusing on the area you corrected. This two-step process—first the UNDER EYE COLOR CORRECTOR, then the concealer—ensures perfect coverage without a thick, mask-like look.
Step 5: Set Gently
To prevent your hard work from creasing or fading throughout the day, you need to set the area. Use a very small amount of a translucent setting powder or a powder that matches your skin tone. With a small, fluffy brush, lightly press the powder into the under-eye area. Avoid baking (applying a thick layer of powder and letting it sit) unless you have very oily skin, as it can be drying and emphasize texture. A light dusting is all you need to lock in your UNDER EYE COLOR CORRECTOR and concealer.
Common Mistakes to Avoid When Using Color Correctors
Even with the best products, it’s easy to make mistakes. Here’s what to watch out for:
-
Mistake #1: Using Too Much Product. This is the biggest error. When you use too much corrector, it can become visible through your foundation and concealer, creating a strange tint. Remember, you only need a thin layer to neutralize the color.
-
Mistake #2: Choosing the Wrong Shade. Using a lavender corrector on blue circles will not work. Always refer back to the color wheel to ensure you’re using the right color for your specific concern. Selecting the wrong shade of UNDER EYE COLOR CORRECTOR is a recipe for a gray, ashy appearance.
-
Mistake #3: Skipping Skin Prep. Applying corrector and concealer to dry, flaky skin will highlight every fine line and wrinkle. Always moisturize first.
-
Mistake #4: Rubbing Instead of Patting. The patting motion is gentle and helps the product melt into the skin. Rubbing will simply remove it and can cause irritation.
-
Mistake #5: Forgetting to Blend the Edges. If you don’t blend the edges of your corrector, you’ll end up with a noticeable ring of color around your corrected area. Blend carefully for a seamless finish.
Product Recommendations: Finding Your Holy Grail Corrector
The world of correctors can be overwhelming. Here are some well-loved products across different price points to get you started. Finding the right UNDER EYE COLOR CORRECTOR is a personal journey, but these are fantastic options.
Drugstore/Budget-Friendly Options:
-
e.l.f. Cosmetics Camo Color Corrector: This is a great, affordable liquid corrector that comes in several shades, including peach and orange. It’s pigmented and blends nicely, making it a perfect starter UNDER EYE COLOR CORRECTOR.
-
NYX Professional Makeup Color Correcting Concealer Palette: This small palette has cream formulas for six different correcting colors. It’s excellent for experimenting with different techniques without spending a lot of money.
-
LA Girl HD Pro Corrector Concealer: These are famous in the beauty community. They are liquid correctors in a tube with a brush applicator, offering high pigment at a very low price point.
Mid-Range Options:
-
Smashbox x Becca Under Eye Brightening Corrector: This cult-favorite product is technically a corrector and brightener in one. It has a peachy-pink tone and a luminous, creamy texture that instantly makes you look more awake. It’s a beloved UNDER EYE COLOR CORRECTOR for many.
-
Bobbi Brown Under Eye Corrector: A classic in the category. Bobbi Brown offers corrector sticks and pots in a wide range of peach and bisque shades for every skin tone. They are known for their creamy, hydrating formula.
-
Tarte CC Color Correcting Undereye Concealer: This product is designed specifically for the under-eye area. It’s hydrating, buildable, and comes in light, medium, and deep shades to target different levels of darkness.
High-End/Luxury Options:
-
Charlotte Tilbury Magic Vanish Color Corrector: This is a creamy, salmon-toned corrector in a stick form. It’s very pigmented and glides on smoothly, offering great coverage for stubborn dark circles.
-
Lancôme Teint Idole Ultra Wear Color Corrector: These liquid correctors are lightweight yet powerful. They blend seamlessly into the skin and work well under the brand’s long-wearing foundation.
Remember, the best UNDER EYE COLOR CORRECTOR for you is the one that matches your skin’s needs, tone, and texture.
Color Correcting for Other Parts of the Face
While the UNDER EYE COLOR CORRECTOR is the most common product, color correcting can be used all over the face. Here’s a quick guide:
-
For Redness Around the Nose and Chin: Use a green color corrector. Apply a tiny dot to the red areas, blend it out, and then apply your foundation over it.
-
For Dullness or Sallowness: If your forehead or jawline looks yellowish, a light lavender corrector can help brighten it up. Mix a tiny bit with your moisturizer or foundation for an all-over brightening effect.
-
For Dark Spots (Hyperpigmentation): Dark spots can have a brown, gray, or purple base. An orange or peach corrector (similar to what you’d use for under-eyes on deeper skin tones) can help neutralize these spots before applying concealer.
The principle is always the same: identify the color of the discoloration, find its opposite on the color wheel, and use a thin layer of that color to cancel it out.
Advanced Tips and Tricks
Once you’re comfortable with the basics, you can try these pro tips:
-
Mix with Primer: If you have overall redness, try mixing a drop of green liquid corrector with your face primer before applying it all over. This will give you a subtle, all-over color correction.
-
Use a Color-Correcting Primer: Many brands make primers that are pre-tinted with correcting colors (e.g., green for redness, lavender for brightness). This is a great low-maintenance option.
-
Layer Formulas: For extremely dark circles, you can sometimes layer a cream corrector for staying power with a tiny amount of a liquid corrector on top for blendability. Experiment carefully to see what works for you.
-
Color Correcting for Different Seasons: Your skin tone might change slightly between summer and winter. The perfect UNDER EYE COLOR CORRECTOR shade for you in December might be different from the one you need in July. It’s okay to have two shades.
The Final Word: Is a Color Corrector Right for You?
Color correcting, especially using an UNDER EYE COLOR CORRECTOR, might seem like an extra, unnecessary step. But if you struggle with dark circles that regular concealer can’t hide, or with redness that always shows through your foundation, it can truly change your makeup game.
It’s not a step you need to do every single day. On “no-makeup” makeup days, you might just use a tinted moisturizer. But for those days when you want your skin to look UNDER EYE COLOR CORRECTOR its absolute best—whether for a special event, a photo, or just because—a color corrector is a powerful tool to have in your arsenal.
It takes a little practice, but the result is worth it: flawless, even-toned skin that looks like skin, not like a mask of makeup. So, find your perfect shade, practice the patting technique, and get ready to say goodbye to dark circles for good. The journey to finding your ideal UNDER EYE COLOR CORRECTOR is the first step towards achieving a radiant, confident look.
Leave A Comment